Getting Started
A Simple Window
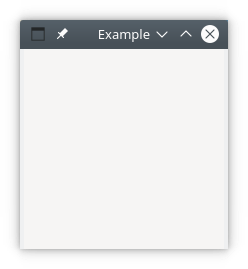
To get an idea of how the modules from the Gnome::Gtk3 package work, a simple example is shown where a window is opened. When the window manager button  is clicked, the application will stop and the GUI will disappear.
use v6;

use Gnome::Gtk3::Main;                                                # 1
use Gnome::Gtk3::Window;

my Gnome::Gtk3::Main $m .= new;                                       # 2

class AppSignalHandlers {                                             # 3
  method exit-program ( ) { $m.quit; }
}

my Gnome::Gtk3::Window $top-window .= new;                            # 4
$top-window.set-title('Example');

my AppSignalHandlers $ash .= new;                                     # 5
$top-window.register-signal( $ash, 'exit-program', 'destroy');

$top-window.show-all;                                                 # 6

$m.main;                                                              # 7
Lets explain some of the code displayed above.
- To start with, load the modules used in this program. These are Gnome::Gtk3::Main and Gnome::Gtk3::Window. They will load class definitions to control the main loop and to handle a plain window.
- Next, we initialize the Main object
$mwhich is used later on to control the so called, event loop. - Then we will setup a class to handle signals. These signals are registered after all widgets are setup and laid out. There is only one method defined in that class to stop the program. Our first GTK method is used here,
.quit()from the Main class to stop our program. Later, when your applications grow bigger, you will see that you will need more than one class to handle all signals so you can separate the different tasks of your program. For example, a class to handle a file menu, or one to handle an input form. - Now we can start creating the widgets. There is always a toplevel widget wherein other widgets are placed. Examples of toplevel widgets are Window or Gnome::Gtk3::Dialog. Here we have used only one widget, a window and its title is set to ‘Example’. This title text is shown at the top of the window in an area called titlebar.
- Initialize the handler class and register signals. We use the
destroysignal to call the.exit-program()method using the handler object$ash. - Then show the window and everything in it.
- Finally we must start the main loop.
To run the program, save the code in a file called simple-example.raku and type the following on the command line (in windows you can double click on the filename).
raku simple-example.raku <Enter>
What we have learned
So, what we have learned here are several specific things which will always come back in all user interface based programs.
- Defining a handler class where all handler methods can reside. However, you are not restricted to one class and you do not have to have the class defined in your main program. You can split the handling in several ‘categories’ e.g. file dialog handling or tree view handling.
- Creating a window and have it a title.
- Add more widgets to the window (not shown here, it is a simple example you know).
- Registration of your callback handlers to handle specific signals.
- Starting and stopping of the main loop.
Simple Window with a Button
The next step is to put something in the window, for example a button. We will make the button act in such a way that clicking on the button will stop the program.

use v6;

use Gnome::Gtk3::Main;
use Gnome::Gtk3::Window;
use Gnome::Gtk3::Button;                                              # 1

my Gnome::Gtk3::Main $m .= new;

class AppSignalHandlers {
  method button-exit ( ) { $m.quit; }                                 # 2
  method exit-program ( ) { $m.quit; }
}
my AppSignalHandlers $ash .= new;

my Gnome::Gtk3::Window $top-window .= new;
$top-window.set-title('With Button');                                 # 3

my Gnome::Gtk3::Button $button .= new(                                # 4
  :label('Exit Our Very Lovely Program')
);
$top-window.add($button);                                             # 5

$button.register-signal( $ash, 'button-exit', 'clicked');             # 6
$top-window.register-signal( $ash, 'exit-program', 'destroy');

$top-window.show-all;

$m.main;
You see that the layout of the program is more or less the same as in our previous example.
- We need to load an extra module Gnome::Gtk3::Button.
- We also have added another method to the handler class to handle the button click but could also have used the same method
.exit-program()in this case. - We have also have used
.set-title()to set the title of the window. - What is new is the creation of a button
- and how it is added to the window.
- Later on the signal handler
.button-exit()is registered to handle the clicked event .
Now save the code in window-button.raku and run it. Pressing the button will stop the program.
The order of creating widgets is often not important so we could also do
my AppSignalHandlers $ash .= new;

with my Gnome::Gtk3::Button $button .= new(
  :label('Exit Our Very Lovely Program')
) {
  .register-signal( $ash, 'button-exit', 'clicked');
}

with my Gnome::Gtk3::Window $top-window .= new {
  .set-title('With Button');
  .register-signal( $ash, 'exit-program', 'destroy');
  .add($button);
  .show-all;
}
Simple Window with two Buttons
Lets go on quickly and add a second button with the .add() method. The relevant part is shown below.
…
my AppSignalHandlers $ash .= new;

with my Gnome::Gtk3::Button $button1 .= new(
  :label('Exit Our Very Lovely Program')
) {
  .register-signal( $ash, 'button-exit', 'clicked');
}

with my Gnome::Gtk3::Button $button2 .= new(
  :label('Exit too with button two')
) {
  .register-signal( $ash, 'button-exit', 'clicked');
}

with my Gnome::Gtk3::Window $top-window .= new {
  .set-title('With 2 Buttons');
  .add($button1);
  .add($button2);
  .register-signal( $ash, 'exit-program', 'destroy');
  .show-all;
}
…
Save it into window-two-buttons.raku and run. When run, we see that there is a problem. There is still one button and an error is shown on the commandline. This error comes directly from the GTK libs and will tell you what goes wrong. The error is;
(window-two-buttons.raku:25360): Gtk-WARNING **: 20:31:04.187: Attempting
to add a widget with type GtkButton to a GtkWindow, but as a GtkBin
subclass a GtkWindow can only contain one widget at a time; it already
contains a widget of type GtkButton
A few things to note here;
- The line 25360 can not be found in our code. It is perhaps a line number in the library or a memory address.
- The objects in GTK+ are named a bit differently but it is easy to see what class we have to look at, e.g. GtkWindow is the native representation of a Gnome::Gtk3::Window class. This native object is also stored within that Raku class.
- We notice a new object, namely a GtkBin which is a parent class of GtkWindow.
The error tells us that the Gnome::Gtk3::Window class is a subclass of Gnome::Gtk3::Bin which is a container able to contain only one object. This is the reason that we only saw one button in the running program.
The proper way
Ok. Need to do things differently then. Lets look at our next attempt which is also a bit more interesting too. The next example is taken from the GTK::Simple package so you can compare the two implementations.
use v6;
use Gnome::Gtk3::Main;
use Gnome::Gtk3::Window;
use Gnome::Gtk3::Grid;
use Gnome::Gtk3::Button;
my Gnome::Gtk3::Main $m .= new;
class AppSignalHandlers { ... }
my AppSignalHandlers $ash .= new;
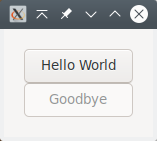
with my Gnome::Gtk3::Button $lower-button .= new(:label('Goodbye')) { # 1
.set-sensitive(False); # 2
.register-signal( $ash, 'lower-button-click', 'clicked');
}
with my Gnome::Gtk3::Button $upper-button .= new(:label('Hello World')) {
.register-signal(
$ash, 'upper-button-click', 'clicked', :$lower-button # 3
);
}
with my Gnome::Gtk3::Grid $grid .= new { # 4
.attach( $upper-button, 0, 0, 1, 1);
.attach( $lower-button, 0, 1, 1, 1);
}
with my Gnome::Gtk3::Window $top-window .= new {
.set-title('Hello GTK!');
.set-border-width(20); # 5
.add($grid);
.register-signal( $ash, 'exit-program', 'destroy');
.show-all;
}
$m.main;
class AppSignalHandlers {
method upper-button-click ( :_widget($b1), :lower-button($b2) ) { # 6
$b1.set-sensitive(False);
$b2.set-sensitive(True);
}
method lower-button-click ( ) { # 7
$m.quit;
}
method exit-program ( ) {
$m.quit;
}
}
We will use a Gnome::Gtk3::Grid to add the buttons to and the grid will be added to the window. Maybe you have heard of GtkVBox and GtkHBox. These are container classes where you can layout other widgets vertically or horizontally. They still exist in Gtk version 3 but are deprecated and therefore not supported by the Raku packages. However, the Grid class can do it all for you and much easier.
- When creating the buttons, we start with the lower one because we need the object in the registration of the handler of the upper button.
- The lower button is disabled using
.set-sensitive()and is visible as a grayed-out button. - The upper button handler is
.upper-button-click(). We see that there is a named argument added called:$lower-buttonto the registration call. You are totally free to add any named argument except for names starting with an underscore. Those names are reserved. The arguments are provided to the handler as is. The reserved named argument:$_widgetwill hold the object on which the handler is registered. - Then an empty grid is created. Add the buttons to the Grid using
.attach(). The integers 0, 0, 1, 1 in the first call mean; first column, first row and take up 1 grid location in width and height. The lower button is placed below the first one taking up the same space. The grid is molded around the buttons taking the minimum space needed. - The method
.set-border-width()on the Window is used to get some space around our buttons. Also the Grid is added on the next line. - The first handler
.upper-button-click()is called when the top button is clicked. It uses the object$b1provided by:_widgetto make that object insensitive. This is the top button and will now become grayed out. The other button$b2given by:lower-buttonis made sensitive. You will see that it ‘returns from its grayness’ so to speak. - The second handler
.lower-button-click()is called when the bottom button is clicked and will call.quit()to stop the program.
What we have learned
- A window can hold only one object while a grid can hold more objects. The grid can be added to the window and other widgets can be added to the grid.
- We learned a few more methods to manipulate widgets e.g.
.set-border-width()and.set-sensitive(). - When registering signal handlers, we can add more information using named arguments but that the
:widgetargument is reserved.