Signals and Events
We are going to see a bit more about signals. First some repetition. We define our signal handler methods in a class of its own. The purpose of that is to separate the handling of signals from the main code. This class is setup around some object with all information it needs. An example could be the handling of a group of radio-buttons. Below a slight different approach where you can see that the class has its business with the top level window.
Such a class can be defined in a separate module which is imported at the start of the program.
class Gui::TopWindow {
  has Gnome::Gtk3::Window $.top-window;

  submethod BUILD ( ) {
    with $!top-window .= new {
      .title('my top level window');
      .register-signal( self, 'exit-program', 'destroy');
    }
  }

  method exit-program ( ) { Gnome::Gtk3::Main.new.gtk-main-quit; }
}

...
my Gui::TopWindow $w .= new;

my Gnome::Gtk3::Grid $grid .= new;
$w.top-window.add($grid);
…
Declaration of the Registration Method
method register-signal (
  $handler-object, Str:D $handler-name,
  Str:D $signal-name, *%user-options
  --> Int
)
We have used the first few arguments $handler-object and $handler-name before and the use of it should be clear as well as the argument $signal-name. With these three arguments you can handle any signal you wish to handle.
Now, I want to tell a bit more about the *%user-options. This is an accumulation of all named attributes given in the argument list to .register-signal(). The user is free to use any named attribute name. Unfortunately however, in the early setup of the routine I claimed the name ‘widget’ to provide the Raku object on which the signal was fired. This is changed now into ‘_widget’ and the older form will be deprecated and free to be used by the developer later after version 0.30.0. From now on all names starting with an underscore (‘_’) are reserved.
my Gnome::Gtk3::DrawingArea $da .= new;
my Gnome::Gtk3::Button $draw-bttn .= new(:label<Draw>);
my Int $handler-id = $draw-bttn.register-signal(
  HandlerObject.new, 'draw-picture', 'clicked',
  :draw-area($da)
);
All of the *%user-options are provided to the signal handler so that the handler can process the signal with access to other variables which might be needed. In the example above, :$draw-area will be passed to the handler.
Together with the user named attributes the arguments :$_widget, :$_native-object and :$_handler-id are also provided.
The handler id is also returned from the call to .register-signal(). More on this in the next section.
Unregistering Signals
There are times that you want to get rid of a signal when your program gets into another phase. For instance in the example above, the drawing area can be replaced with something else or removed altogether and the button may get another function. You could remove the button too and create a new one and register a new handler but there could be reasons that it wouldn’t be easy to do so, for instance you have the button object but don’t know in which container it is placed in. Here the handler id comes in because you need it to remove the handler.
has Int $!handler-id;
has Gnome::Gtk3::Button $!draw-bttn;
…
$!draw-bttn .= new(:label<Draw>);
$!handler-id = $!draw-bttn.register-signal(
  HandlerObject.new, 'draw-picture', 'clicked',
  :draw-area($da)
);
…

# After some time we want to change the 'clicked' signal handling
$!draw-bttn.handler-disconnect($!handler-id);
…
Or done in a handler
$_widget.handler-disconnect($_handler-id);
…
So, that was easy 😉.
A note about :$_native-object
The $_native-object variable provided to the handler is the same native object as stored within the Raku object provided in $_widget. However, there are situations that the Raku object gets invalidated; $_widget.is-valid() ~~ False. This is quickly remedied when it can be expected, like so;
method handler (
  …,
  Gnome::Gtk3::Button :_widget($button) is copy,
  N_GObject :_native-object($no),
  …
) {
  $button .= new(:native-object($no)) unless $button.is-valid;
  …
}
Other Signals
Each of the Gnome objects who can handle signals have some detailed information in their documentation. If we look for example at the key-press-event defined for Gnome::Gtk3::Widget we see the following handler declaration;
method handler (
  N-GdkEventKey $event,
  Int :$_handler_id,
  Gnome::GObject::Object :_widget($widget),
  *%user-options
  --> Int
);
All named arguments are optional but the positional arguments, if any, are not. Also the positional arguments must have a type!. Above we see that $event has a type N-GdkEventKey which is a structure from Gnome::Gdk3::Events.
To show what you can do, here is another code snippet;
class HandlerObject {

  # if you want to test more event types
  method show-keys ( N-GdkEvent $event ) {

    say "\nevent type: ", GdkEventType($event.type);

    if $event.type ~~ GDK_KEY_PRESS {
      my N-GdkEventKey $event-key := $event.event-key;
      say "key: ", $event-key.keyval.fmt('0x%04x');

      if $event-key.keyval == GDK_KEY_Return {
        note "Typed an <Enter> key";
      }
    }
  }
}

my Gnome::Gtk3::Frame $my-key-input .= new;
$my-key-input.register-signal(
  HandlerObject.new, 'show-keys', 'key-press-event'
);
...
The N-GdkEvent type is a union of event structures of which N-GdkEventKey is one of them. Of all these structures, the first three fields are the same. The structure N-GdkEventAny is only holding these values. That’s the reason why you can test its type and then access the other fields using the N-GdkEventKey type by binding the variable to it. If only one type of event is processed by your handler, you could skip a few tests and have method show-keys ( N-GdkEventKey $key-event ) directly in your handler declaration.
You can test the keys for its values such as GDK_KEY_Return used in the example. The names can be found here: Gnome::Gdk3::Keysyms.
Event Loop
Most of the time the program only have to sit back and wait for the user of your precious application to press a button or generate an action of some sort. Most of the time the actions are short lived and the program returns to its waiting state. This state is called the event loop where the program is waiting for events to happen. The state is entered with the call to Gnome::Gtk3::Main.new().gtk-main() and ended with .gtk-main-quit() in the Gnome::Gtk3::Main object.
However, every action performed by your code will freeze the user interface. As mentioned above, this processing time is mostly short and the freezing is barely noticed. When you have to do something substantial you will have to check for events yourself and let the library process the queued events to prevent an unresponsive interface.
You can do this by inserting the following code on regular spots in your code;
my Gnome::Gtk3::Main $main;
...
while $main.events-pending {
  $main.main-iteration;
}
Or an even smaller snippet;
my Bool $exited = ? $main.main-iteration(False);
Only you won’t know if there were any events processed. The value returned is 0 or 1 to show if the current event loop was exited.
Yes, current event loop, because event loops can be nested, although, I do not yet have a good example for it. It seems that dialog widgets use a local event loop. A modal dialog shields the events from parent windows off by just doing that. To get the current loop nesting level call $main.main-level().
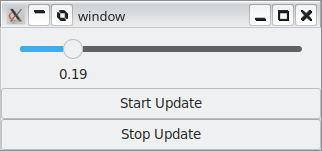
There are other ways to run code and keep the interface responsive as is shown in the next example. It shows a scale widget which you can change and two buttons Start Update and Stop Update. The start update button is used to start a process in a thread which mimic computations and show results by moving the scale left or right. The stop update button stops that process. While running, all gui elements stay responsive while running the ‘updates’.
use v6;

use Gnome::Gtk3::Enums;
use Gnome::Gtk3::Window;
use Gnome::Gtk3::Button;
use Gnome::Gtk3::Grid;
use Gnome::Gtk3::Main;
use Gnome::Gtk3::Scale;

use Semaphore::ReadersWriters;

#--------------------------------------------------------------------------
class X {                                                               # 1
  has Bool $!running-update = False;
  has Semaphore::ReadersWriters $!rw-sem;
  has Promise $!promise;
  has Num $!step;
  has Gnome::Gtk3::Main $!main;
  has Gnome::Gtk3::Scale $!scale;

  submethod BUILD ( Gnome::Gtk3::Scale :$!scale, Num :$!step = 1e-1 ) {
    $!rw-sem .= new;                                                    # 2
    $!rw-sem.add-mutex-names(
      <running-sem promise>, :RWPatternType(C-RW-WRITERPRIO)
    );

    $!main .= new;
  }

  method exit-app ( ) {
    $!main.quit;
  }

  method update-scale ( ) {
    while $!rw-sem.reader( 'running-sem', { $!running-update; }) {      # 2a
      my Num $v = $!scale.get-value + $!step;
      note "value; $v";

      if $v >= 1e0 or $v <= 0e0 {
        $!step = -$!step;
      }

      $!scale.set-value($v);
      sleep(1.1);
    }

    # return result of promise
    'stopped running'
  }

  method start-update ( Gnome::Gtk3::Button :_widget($button) ) {
    return if $!rw-sem.reader( 'promise', { $!promise.defined });

    $!rw-sem.writer( 'running-sem', { $!running-update = True; });      # 2b
    $!rw-sem.writer( 'promise', {                                       # 3
        $!promise = $button.start-thread(
          self, 'update-scale', :start-time(now + 1.1),
          :new-context
        );
      }
    );
  }

  method stop-update ( Gnome::Gtk3::Button :_widget($button) ) {
    $!rw-sem.writer( 'running-sem', { $!running-update = False; });

    $!rw-sem.writer( 'promise', {
        await $!promise if $!promise.defined;
        $!promise = Promise;
      }
    );
  }
}

#--------------------------------------------------------------------------
my X $x;                                                                # 4
with my Gnome::Gtk3::Scale $scale .= new {
  $x .= new( :$scale, :step(103e-3));

  .set-hexpand(True);
  .set-vexpand(True);
  .set-halign(GTK_ALIGN_FILL);
  .set-margin-top(5);
  .set-margin-start(10);
  .set-margin-end(10);
  .set-margin-bottom(5);
  .set-range( 0.0, 1.0);
  .set-value-pos(GTK_POS_BOTTOM);
  .set-digits(2);
  .set_size_request( 300, 50);
}

my Gnome::Gtk3::Button $button-start .= new(:label('Start Update'));
$button-start.register-signal( $x, 'start-update', 'clicked');

my Gnome::Gtk3::Button $button-stop .= new(:label('Stop Update'));
$button-stop.register-signal( $x, 'stop-update', 'clicked');

with my Gnome::Gtk3::Grid $grid .= new {
  .attach( $scale, 0, 0, 1, 1);
  .attach( $button-start, 0, 1, 1, 1);
  .attach( $button-stop, 0, 2, 1, 1);
}

with my Gnome::Gtk3::Window $window .= new {
  .set-title('window');
  .add($grid);
  .register-signal( $x, 'exit-app', 'destroy');
  .show-all;
}

Gnome::Gtk3::Main.new.main;                                             # 5
1) Class X is controlling a few veriables which are accessed from several threads and need therefore some protection using semaphores. There is a package for this called Semaphore::ReadersWriters. See also readers-writers problem on wikipedia.
2) Initializing the semaphores uses two keys to control two semaphores for the variables $!promise and $!running-update. Later on you see examples of reading and writing the variables using the semaphores.
a) Example read of variable $!running-update
b) Example write of the same variable.
3) You cannot blindly start a thread and try to update the interface from there. The Glib library provides several ways to enter a thread safely. The routine .start-thread() from Gnome::GObject::Object does that for you and returns a Promise object.
* Option :start-time gives you the opportunity to let the thread wait a little before taking off.
* Option :new-context is a necessary option which controls the creation of a separate context. This is needed if one is to show the changes in the Gui otherwise it will still use the main loop and the Gui will freeze.
4) Initialization and configuration of the user interface 5) Enter the main loop
Sending Events
I believe that sending an event to some widget is seldom used but it is possible to, for example, send a click event to a button and start the action for that event. A test interface (already in the making) could make use of this so a Gui can be tested by a script instead of the tedious repeated work of pressing all buttons and providing input to see if the program still works.
In the next program example we’ll see the use of .emit-by-name() from Gnome::GObject::Signal. It is a bit of a fun application which could work much more easy using .set-active() on the check box widget but there is also our motto TIMTOWTDI or There Is More Than One Way To Do It!
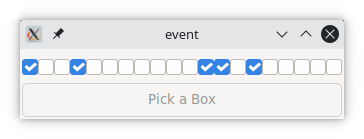
Clicking on the button named ‘Pick a Box’ will choose a checkbox to send a clicked event to one of the check buttons. After receiving the event, the checkbox toggles between its on or off state and calls the callback routine. This callback routine writes the result information to the console wherein the program is started.
use v6;

use Gnome::Gtk3::Window;
use Gnome::Gtk3::Button;
use Gnome::Gtk3::Grid;
use Gnome::Gtk3::Main;
use Gnome::Gtk3::CheckButton;

#--------------------------------------------------------------------------
class X {
  has Array[Gnome::Gtk3::CheckButton] $!cba;

  submethod BUILD ( :$grid ) {
    $!cba .= new;
    for ^20 -> $i {                                                     # 1
      my Gnome::Gtk3::CheckButton $cb .= new;
      given $cb {
        .set-name("$i");
        .set-hexpand(True);
        .set-vexpand(True);
      }

      $grid.attach( $cb, $i, 0, 1, 1);

      $cb.register-signal( self, 'check-box-toggle', 'toggled');        # 2
      $!cba.push: $cb;
    }
  }

  method exit-app ( ) {
    Gnome::Gtk3::Main.new.gtk-main-quit;
  }

  method check-box-toggle ( Gnome::Gtk3::CheckButton :_widget($cb) ) {
    note "Picked box $cb.get-name()";
  }

  method pick-a-box ( ) {
    $!cba.pick.emit-by-name('clicked');
  }
}

#--------------------------------------------------------------------------
my Gnome::Gtk3::Grid $grid .= new;
my X $x .= new(:$grid);

my Gnome::Gtk3::Button $button .= new(:label('Pick a Box'));            # 3
$button.register-signal( $x, 'pick-a-box', 'clicked');
$grid.attach( $button, 0, 1, 20, 1);                                    # 4

with my Gnome::Gtk3::Window $window .= new  {
  .add($grid);
  .set-title('event');
  .set-border-width(2);
  .set_size_request( 200, 70);
  .register-signal( $x, 'exit-app', 'destroy');
  .show-all;
}

Gnome::Gtk3::Main.new.main;
Most of the code is obvious after seeing several examples.
1) In the initialization of class X it generates 20 check buttons and place these in the first row of the given grid.
2) We use the toggled signal to call the X.check-box-toggle() method.
3) The method X.pick-a-box() will randomly choose one of the generated check buttons to send the event clicked to. Here the method .emit-by-name() is called to do just that.
4) The second row of the grid is occupied by the button over all its horizontal grid cells, 20 cells that is. It is setup to call method X.pick-a-box() after procesing the clicked event.