A Toggle Button
The toggle button is a type of button which reminds an on and off state switching from one to the other when clicked/pressed. In itself it is easy to use it, just like a button, we only make the representation of the button a bit more interesting.
What we will learn
This tutorial brings a few new things;
- Use of a Gnome::Gtk4::ToggleButton.
- Modifying the child widget of the toggle button widget. Normally, a label is set, which means that there is only some text on the button to be seen. This text is kept in a native Gnome::Gtk4::Label.
The program
I leave it here as an exercise to import the modules. What we will need here is N-MainLoop, ToggleButton, Window, Frame, Box, Label, Image, T-enums, GlibToRakuTypes, N-Object. Two things to remember a) attach :api<2> to each line and b) not all modules are in Gtk4. Some are from Glib and N.
Also the program makes use of constants to create smaller types. E.g. constant Window = Gnome::Gtk4::Window; to use Window as a type.
We now make a class where it all happens. We need the event loop and initialize it while initializing the ToggleDisplay class.
class ToggleDisplay {
  has Gnome::Glib::N-MainLoop $!main-loop;

  submethod BUILD ( ) {
    $!main-loop .= new-mainloop( N-Object, True);
The toggle button is created. Normally you do something like calling .new-with-label() and be done with it. Here we will set the child object of the toggle button with an object created in .make-led-text-widget() defined in the same class. Then we set an event handler for the toggled event. Because we have set the toggle widget active, the led will be turned on at start.
with my ToggleButton $toggle-button .= new-togglebutton {
.set-active(True);
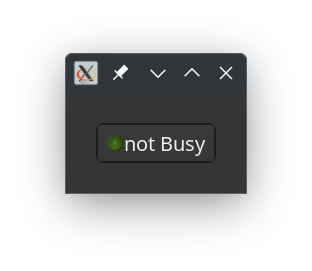
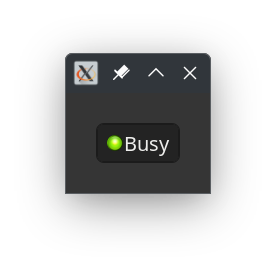
.set-child(self.make-led-text-widget( 'Busy', True));
.register-signal( self, 'toggle', 'toggled');
}
The rest is simple. Make a Frame and place the button in it. Then a Window and set the Frame in it. The last task in the initialization is to ignite the event loop.
    with my Frame $frame .= new-frame {
      .set-margin-top(30);
      .set-margin-bottom(30);
      .set-margin-start(30);
      .set-margin-end(30);

      .set-child($toggle-button);
    }

    with my Window $window .= new-window {
      .register-signal( self, 'stopit', 'close-request');
      .set-title('Toggle Display!');
      .set-child($frame);

      .present;
    }

    $!main-loop.run;
  }
The widget for the toggle button will be a horizontal Box with an Image and a Label. The Box is returned from the .make-led-text-widget() method. Note that the images used are an Off and an On led icon from somewhere on my disk. You should find yourself a pair of images and place it where the program can read them, then change the path to it (here: ‘/home/marcel/Graphics/IconsArchive/Icons/32n/ledIcon/’);
  method make-led-text-widget (
    Str:D $purpose, Bool:D $state --> Gnome::Gtk4::Box
  ) {
    my Str $icons = '/home/marcel/Graphics/IconsArchive/Icons/32n/ledIcon/';
    my Str $image = $state ?? 'green-on-32.png' !! 'green-off-32.png';

    my Gnome::Gtk4::Box $hbox .= new-box( GTK_ORIENTATION_HORIZONTAL, 1);

    my Image $led-image .= new-image;
    $led-image.set-from-file($icons ~ $image);
    $hbox.append($led-image);

    my Label $text .= new-label($purpose);
    $hbox.append($text);

    $hbox
  }
As always a quit event handler.
  method stopit ( --> gboolean ) {
    $!main-loop.quit;

    0
  }
And a handler for the toggle events on the ToggleButton. Now the created ‘led image and text’ widget is set on the toggle button using the call .set-child().
  method toggle ( ToggleButton() :_native-object($toggle-button) ) {
    my Bool $state = $toggle-button.get-active;
    my Gnome::Gtk4::Box $widget = self.make-led-text-widget( 'Busy', $state);
    $toggle-button.set-child($widget);
  }
}
The program is started by instantiating the class.
ToggleDisplay.new;
The results should be:
and after clicking